


Hi friends! In this article, I want to talk to everyone who owns or uses a Concept 2 rowing machine about the importance of the force curve you see on the display of your performance monitor.
Chances are that you’ve seen this graph on your PM and wondered what the heck it was. You may realize that it’s trying to give you some form of data, but what could it mean?
My name is Petra, and if you own a Concept 2 but have no idea what a force curve is, you’ll definitely find this article interesting, even if it is a bit nerdy.
The force curve is rather simple, so let’s get started.
What Is the Force Curve Concept?

I remember when I first heard those words, Force Curve Concept, I thought that Concept 2 had come out with a new type of rowing machine! (It’s a great name, right?!)
However, the force curve is Concept 2’s way of giving you a visual on the amount of force you are putting out on your rowing machine and when you are doing it.
Just by looking at the curve – yes, without looking at all those numbers – you get an idea of how you’re performing. One glance does it, now isn’t that cool?!
Understanding the Concept 2 Force Curve
Understanding the force curve is a terrific way to improve your form and reduce your split time.
Force curve measures how you apply force during your rowing stroke. The amount of force and when you apply it varies from beginning to end of a stroke, and that’s what you see on a force curve.
In other words, the force curve is a visual of the quality of your stroke and the force you apply. It shows how powerful your strokes are at every phase, when the peak occurs and how high, how long you sustain that power, and how it goes down for recovery.
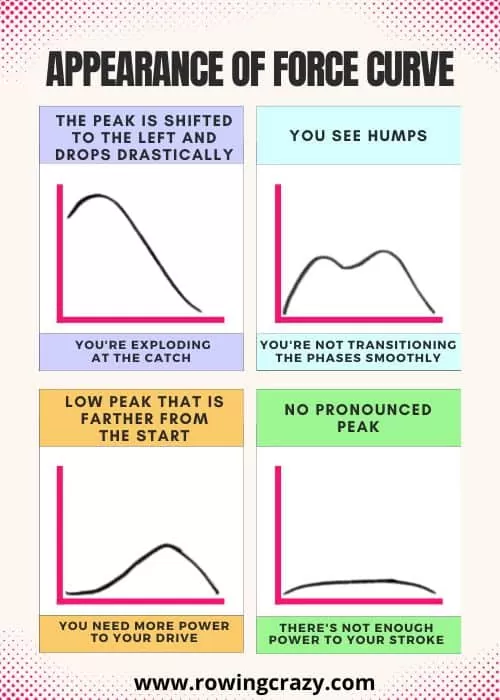
Appearance of Force Curve & What It Means
- The peak is shifted to the left and drops drastically – you’re exploding at the catch.
- You see humps – you’re not transitioning the phases smoothly.
- Low peak that is farther from the start – you need more power to your drive.
- No pronounced peak – there’s not enough power to your stroke.
When the curve is flat without a pronounced peak, well, I think you may as well get off the machine and take a walk in the park. Literally!
If you’ve done any Crossfit, you know that they are all about POWER, and I’m definitely on that train of thought.
Think about it. Anyone can mosey along on a rowing machine, doing 15 SPM or doing the strokes incorrectly. They could even be rushing along, going fast as heck but aren’t really “going” anywhere, so to speak.
Why? Because their force curve is all off!
What Is the Ideal Force Curve for Rowing?
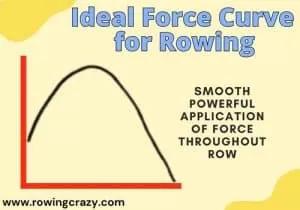
The force curve must be smooth. It rises from the left, peaks near the center (slightly left-centered), and has a longer curve going down.
The larger the space from the beginning to the end means that your stroke form is spot on, and you are getting the most force for the amount of effort you are putting out.
Your ideal force curve shows that you push off hard with your legs, which should be the main source of power when you row. This should be followed by a strong body, including the back and core, and finally, the power of the arms when you pull on the handle.
Look at the force curve graph from your last workout. Does it have a single peak or does it look like several peaks and a valley? Is it more triangular or rectangular?
Improving Your Force Curve

If your force curve isn’t picture-perfect, don’t worry! That’s what this article is about!
Look at the force curve from your last rowing session.
- If the curve graph starts off really high but then quickly dips, you are exploding at the catch, but then you have little left to give during the remainder of the stroke. Instead, aim for a strong catch that will lead to an explosive drive and longer recovery.
- A dip in the middle of the graph that looks like camel humps can mean that you have a disconnect somewhere between the legs and arms. Use a mirror to see where you lose your rhythm. Strive to make your rowing motion more fluid.
- If the graph looks like the opposite of what it should, low in the start but then higher at the end, you aren’t using your legs like you should. Try our improvement method called pick drill.
- If your graph looks more like a flat mound, you aren’t putting enough effort into the stroke overall.
You may never have paid too much attention to the Concept 2 force curve graph, but in my opinion, it’s the best tool that Concept 2 has!
My Best Tips
I know many rowers tend to focus on their split time or the length of time they have left, or possibly the number of meters they have left to row.
For a change, try the “Change Units” button until you find the “Display Power Curve” option and display the split time average as well.
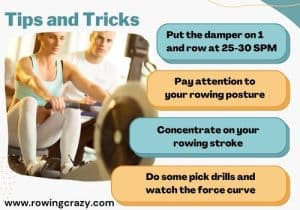
Keep these two items on your PM display and try the following tricks:
- Put the damper on 1 and row at 25-30 SPM. Focus on creating smooth, consistent force curve movements for 10 minutes. This is like giving an Olympic weightlifter a coathanger to practice the proper movements.
- Pay attention to your rowing posture. I’ve found that using a mirror really helps, or you can film yourself using your phone and then play it back to see where and when you lose your posture.
- Concentrate on your rowing stroke. Don’t even think speed right now, just focus on your stroke. Push through the heels, lean back but keep the torso straight, pull using the arms, and then release, swing your hips so that you rock forward but don’t slouch the upper back.
- Do some pick drills and watch the force curve. Is there a double peak with a slump in the middle? Does the graph look jerky like a drunk person’s drawing? Try changing how you do the pick drill and see how the graph changes in response.
Learn more with our Certified Indoor Rowing & Erg Instructor Laura Tanley:
Yes, these exercises take time, but I can guarantee that if you take that extra time to make your force curve graph as smooth as possible, it will pay off big time!
Can you imagine cutting seconds off of your split time? That’s exactly what you can do if you work on perfecting your force curve.
The Bottom Line
The force curve is the most powerful tool that a coach could ever ask for, and I’m often surprised that only a few coaches mention this feature.
You can row all day long, but if your force curve isn’t up to snuff, you won’t get much power from your body.
Keep your display open so that you can see the force curve every time you get on your Concept 2 for the next month and see how your body responds to it.
I bet that by paying attention to the curve and trying to make the most of it, you will find you shave seconds off of your split time.
Keep rowing to a healthy body and mind!

Written by Petra Amara – RowingCrazy.com
CEO & Founder of RowingCrazy, National Rower, Coxswain Womens Eight Team, Rowing Coach & Writer
Petra is a Mother of two and owner of Rowingcrazy.com. Petra lives and breathes rowing, she also has a passion for writing which lead her to start RowingCrazy.com to share her rowing experience and expertise with others.