


Hi friends! Glad to see you again.
If you are wondering what the Drive phase is, or what the four rowing phases are, how to perfect your rowing technique, or even what the heck “Recovery phase” means, this article is for you.
By the end of this article, you will have the answers to your biggest questions because today, I want to address beginners who have little idea about most rowing terminologies, including the Drive.
Don’t be embarrassed to admit it. No one is born knowing how to row. We were all beginners once, so as my mother used to say, “There are no stupid questions.”
Are you ready? Let’s get this boat up to speed and get moving!
What Is the Drive Phase in a Rowing Stroke?
The short and simple answer to this question is this: The Drive phase is what powers the boat.
If we are talking about a rowing machine, you should think of the drive phase as the power phase.
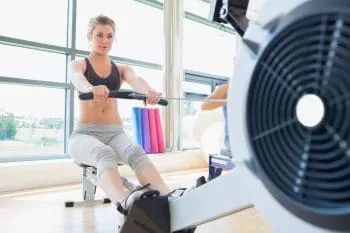 When rowing, the Drive is when you push back with your legs, getting all the power that you can muster.
This isn’t just pushing with your legs, but the unfolding of the entire body that was compressed during the Catch position. The Drive gives you all the power to move your “boat” across the water, and a good drive sequence increases boat speed.
Now you might be asking yourself what the Catch position or Catch phase is.
Let’s talk about the entire rowing stroke.
- RELATED POST: Will Rowing Get Me In Shape?
What Are the 4 Phases of the Rowing Stroke?
The rowing technique can be quite confusing for beginners but it’s actually very simple.
The four phases are as follows:
- The Catch
- The Drive
- The Finish
- The Recovery
Here in this video Laura Tanley (Our Certified Rowing Instructor) Demonstrates the Rowing Strokes
Let’s look at each rowing action individually.
The Catch Phase
This is the starting position. Your shins should be vertical to the floor. You may need to lean forward slightly. Your feet should be about 6 to 8 inches from your seat, heels slightly lifted off the footpads.
The Drive Phase
This is almost a two-part movement.
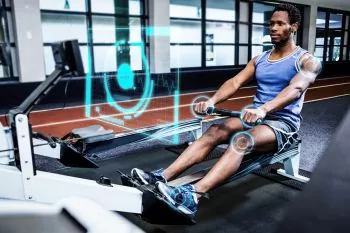
First, you will push the seat back by driving your energy into your heels. Keep your upper body straight and your arms straight.
Once your legs are fully extended, you lean back very slightly to engage your core. If you think of your torso as the hands on a clock, you should lean back to the 11 o’clock position. You should feel your core muscles and glutes engage at the very end of the stroke.
This is one fluid movement, with no stopping point in the middle. You might be tempted to begin to pull on the handle, but don’t do that just yet.
The Finish Phase
You know that you are at the end of the drive when your legs have full extension. The finish (aka release) is when you will pull the handle towards the bottom of your ribcage. The correct order of movement is legs (pushing you back), moving the torso back, then pulling on the handle.
Watch our Youtube video below by expert rower Max Secunda:
The Recovery Phase
While the word recovery might have you thinking about resting, and in a way you are resting, it is just as important as the drive. The sequence here is the reverse of what I told you in the finish:
Release your arms (let the handle go back in front of you and keep your arms straight), move your torso back to the neutral (straight up) position, then let your knees bend, which should make you perfectly lined up to return to the catch position.
It sounds more complicated than it is. You can make up a little mantra to chant while rowing if it helps you remember: legs, hips, arms, then the reverse, arms, hips, legs.
Start off slowly (16 to 20 strokes per minute, or SPM) and either use a mirror so you can watch your posture or make a video of yourself, and then watch to see how you are doing. Side Note: If you are looking for a well priced home rowing machine be sure to check out my full article on the Xterra Rower.
Learn Correct Rowing Technique from Olympic Rower Rachael Taylor:
Common Rowing Mistakes to Avoid
Don’t feel bad if you discover that your rowing form isn’t perfect. This is really normal, and it happens to everyone.
The trick is to keep working on your form. This will not only improve your speed, but it will help to prevent you from becoming injured.
Some of the more common rowing mistakes beginners make include:
- Rowing mainly with the arms. A great many people think that they can row “faster” by pulling harder on the handle, but that’s like thinking you’re running faster by moving your hands in and back. Focus on the drive, this is where you will get maximum power and speed.
- Pulling on the handle too soon. Beginners think that if they pull on the handle as they are doing the drive sequence, they will get more power out of their stroke, but this isn’t true. This is a waste of your energy since you will have no power to give during the finish position. Train yourself to wait until you have almost completed the drive sequence before you pull on the handle.
- Slouching shoulders. This is a big problem for beginners. It feels natural to let your chest cave in on the catch but you will end up with a sore upper back. You can keep your arms straight and not let your chest cave inward on the catch. Focus on keeping your shoulders back and down during all phases of the rowing stroke. This is a good technique that will not only give you more power but will prevent pain later on.
- Bending your knees too early. I’ve seen many beginners pull on the handle at the correct time (during the finish) but they also bend their knees at the same time. Keep your legs straight ahead until you have released the handle.
- Leaning too far back. I mentioned earlier that you should think of your torso as the hands on a clock. During the finish stroke, you should not lean back any further than the 11 o’clock position. Yes, with time, your core muscles will become stronger and your form will improve, but for beginners, you will end up with a low backache if you try to do too much too soon. Let your upper body either stay straight up or lean back just slightly.
- Letting your booty take the lead. In an effort to get more power out of the drive, I’ve seen beginners push their butt back before the leg drive. This also puts a big strain on your lower back. Focus on keeping your torso as straight as possible to avoid a lower back injury or pain.
- Chicken wings. When pulling on the handle, some beginners like to stick their elbows way out to the side, like a chicken trying to fly. Others keep their elbows tucked away so tightly that they can’t pull the handle to its full length. Try to keep your shoulders down and grip the outside edge of the handle. Aim to let your elbows bend to the outside a bit, but not so much that you look like a fledgling bird.

If you need help with your form, you can always hit up your local gym or local rowing clubs. Nearly every major city offers classes to help you with your form.
If you are lucky enough to own a Hydrow or an Ergatta rowing machine, they have pre-programmed classes for beginners that are a big, big help.

The Bottom Line
Learning the proper rowing form is not as difficult as you might think. I’ve found many beginners pick up the four phases of rowing in a matter of a couple of hours.
While your fitness level might make rowing a bit more challenging, learning to use the rowing machine itself isn’t difficult.
I imagine that, as a beginner, you can’t wait for your next rowing workout. Try some of the tips I’ve mentioned here, and you will have less stress and more fun during your next workout.
Stay happy and healthy! Keep rowing, friends!

Written by Petra Amara – RowingCrazy.com
CEO & Founder of RowingCrazy, National Rower, Coxswain Womens Eight Team, Rowing Coach & Writer
Petra is a Mother of two and owner of Rowingcrazy.com. Petra lives and breathes rowing, she also has a passion for writing which lead her to start RowingCrazy.com to share her rowing experience and expertise with others.

Pingback:
Pingback:
Pingback:
Pingback: Can You Get Neck Ache from Rowing? - Fresh Trending vehicles news