

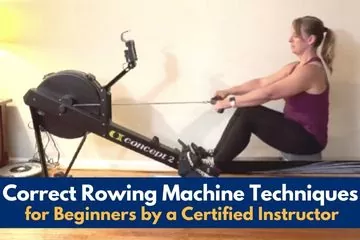
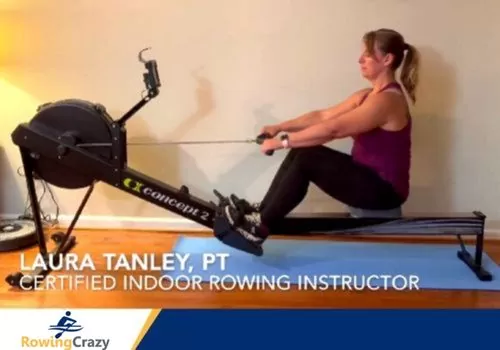
Hi I’m Laura Tanley, I am a certified indoor rowing machine & erg instructor, I am also an experienced indoor & on the water rower & a licensed Physical Therapist.
Today I want to talk to you about something that many people often ask me about, especially when I work one on one with new clients and that is having the correct rowing machine technique when working out.
Below are some of my personal tips and videos to help you get started on a safe and effective workout. So let’s just jump straight into it!
How Should a Beginner Start Rowing?
Honestly, I always tell new or novice rowers – to start gently! Jumping in and going hard when you have not exercised or rowed on a rowing machine for a long time will only end up with you having an injury.
As we all know that means you probably won’t continue working out and that’s a shame as rowing offers a great full-body work.
So take a step back, learn the correct form and before you know it you’ll be an expert rower!
Watch our Youtube video below by expert rower Max Secunda:
Learn Proper Form and Rowing Technique
This is essential to avoid injury and will also give you a more effective workout.
My Top Rowing Workout Tips
Try watching videos as they can be helpful.
Get a good understanding of the Catch and Finish position. Then begin slow and purposeful, going through each phase of the rowing stroke to build muscle memory.
Here’s a video I’ve made to help you get in the correct form for the Catch and Finish positions:
Watch Certified Indoor Rowing & Erg Instructor Laura Tanley Show You the Correct Rowing Positions
At this point, don’t worry about the numbers on the screen.
Make Necessary Adjustments on the Erg Before Doing a Workout
Adjust your erg/rowing machine foot plates, if adjustable. Typically, the strap should be over the widest part of your foot to allow your shin to be almost perpendicular to the slide when you bend or flex your knees.
If rowing on a Concept 2, adjust your damper setting between 3 and 5. It is a common misconception that the damper setting is “resistance” and higher is better. This is not the case.
The rowing machine is an ergometer, which by definition means that the more you put into it, the more you will get out of it. The damper setting controls the air flow and therefore the drag factor (learn more about drag settings here).
It can be compared to gears on a bike or, in rowing terms, rowing with or against the current. Rowing at a high damper setting can increase the risk of injury for a new rower and wear you out too quickly.
Practice, Practice, Practice
Did I mention practice? Once again, begin slow and purposeful to establish correct form. Once this becomes comfortable, begin working on other variables such as power and endurance.
Try Some Drills
Drills can be very beneficial to help perfect your form, stroke rate, as well as building up your rowing endurance.
Don’t Forget to Warm Up
Warm up those muscles before jumping right in. This can be done with a gentle row, or you can try the PICK drill.
- If Like This Article Read More of My Articles Here – Laura Tanley
What Is Proper Rowing Technique?
There are four phases to the rowing stroke, namely, the Catch, Drive, Finish, and Recovery.
Each phase is separate but vitally important to the ensuing phase and, when done correctly, produces a smooth rhythmic flow.
This video shows me going through the four phases of the rowing stroke and the basics of indoor rowing:
Watch Certified Rowing Instructor Laura Tanley Show You the Basic Rowing Technique for Beginners
In the following instructions, we will begin at the Finish, because this is where the Recovery begins, and a good Recovery sets up a good Catch which is critical for a good Drive!
The Finish
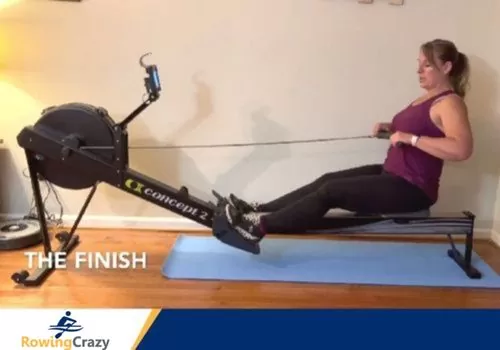
The Finish Position
- Sit up tall on your seat- no slouching (you should feel your “sits bones” or ischial tuberosities poking into the seat), then slightly pivot back from your hips to the eleven o’clock body position. Shoulders should be slightly behind your hips.
- Knees extended straight but not “locked”
- Holding handle towards the ends, loose grip with fingers and thumb wrapped around. Keep wrists in neutral, pull in towards your chest, at the lower ribs or just below the bra line. Eelbows should be pulled back and slightly out.
- Shoulders should be relaxed not shrugged up toward your ears. Head/neck should be in neutral, looking straight ahead.
The Recovery
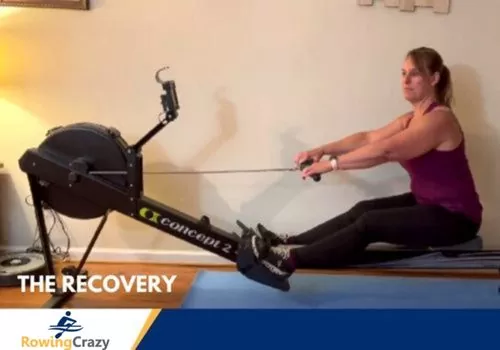
The Recovery Position
- From the Finish position, quickly extend your arms straight out maintaining a level chain
- Next, pivot your body forward from your hips to the 1:00 body position. Remember to stay sitting up tall, maintaining your posture throughout your spine/torso.
- Finally, bend your legs (knees and hips), sliding your seat forward until your shins are nearly upright or perpendicular to the slide. Your knees should be inside your arms.
- Be sure to maintain your upright posture and 1:00 body position all the way forward. Do not allow your back to slouch or hips to tuck under you. If you lack flexibility, it is OK to modify and not go all the way to the shin upright position.
- The Recovery has its name for a reason, no need to rush.
The Catch
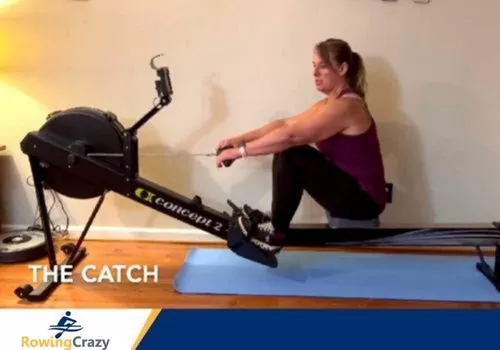
The Catch Position
- This places you in a nice Catch position.
- Your arms should be extended out, shoulders relaxed, wrists in neutral.
- Your body should be pivoted forward to the 1:00 body position with your back in a good upright posture. Neck/head in neutral and looking straight ahead.
- Your hips and knees should be bent, ideally to the upright/perpendicular shin position or as close as you can, while still maintaining your body-over position and posture.
- Your knees should be inside your arms.
The Drive

The Drive Position
- From this strong Catch position, you are now ready for the Drive.
- Maintain your locked body-over position with a tight core and extended arms, while you drive with the legs. Push, translating pressure through the heels, until your legs are almost fully extended.
- Next, pivot your body back from the hips, moving from the 1:00 to the 11:00 position, still maintaining your upright posture.
- Finally, with your arms, pull the handle in towards your chest, lower ribs or just below the bra line. Elbows should be pulled back and slightly out, wrists in neutral, shoulders relaxed.
- You are now back at the finish!
Drills to Improve Rowing Technique
A great way to master proper rowing technique is to add some drills. I suggest you try the following drills- I’m sure you’ll find the videos helpful.
Pick Drill
In this video, I show you how to do a Pick Drill:
- Begin at the finish, with arm only rowing.
- After 10-15 strokes, at arms away, add in the pivot at the hips/body from 11-1 o’clock for 10-15 strokes.
- Then add in the half slide (adding in legs but only partially bending and going halfway up the slide) for 10-15 strokes, followed by full slide.
Legs Only Drill
In this video, I show you how to do a Legs Only Drill:
- Begin at the catch, maintain your posture with arms out and body over, core engaged while you drive with your legs.
- The angle between your back/body and the floor should be constant, and the handle and your seat should move together at the same pace, maintaining the same distance between them.
Reverse Pick Drill
In this video, I show you how to do a Reverse Pick Drill:
- Begin at the catch, with leg-only rowing as above.
- After 10-15 strokes, at the end of the leg drive, add in the pivot at the hips/body from 1-11 o’clock (legs and body only).
- After 10-15 strokes, add in the arms for a complete rowing stroke.
Common Rowing Mistakes
If you have not perfected your rowing form and technique, it’s easy to commit mistakes on the rowing machine. Let me take you through the most common rowing mistakes and wrong notions that some people have about indoor rowing.
In General
- Damper setting set too high – This is a whole topic by itself but higher is not better. Begin mid range, 4-5. As you become more experienced, experiment to find which setting you are most effective at. Even Olympic rowers complete most of their workouts in a mid range.
- Mistaking stroke rate as a measure of power – Moving faster should be better, right? Wrong. Moving faster often leads to a loss of form, which then leads to lower power.
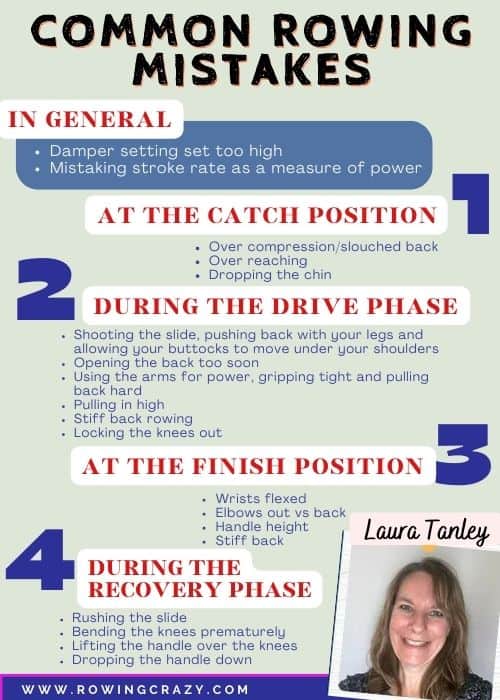
At the Catch Position
- Over compression/slouched back (losing your upright torso/spine posture and allowing pelvis to tuck under) – This weakens your drive rather than allowing the power to translate through a tight/stable core.
- Over reaching – Reaching too far forward causes you to lose power.
- Dropping the chin – Once the chin drops, the spine wants to follow.
During the Drive Phase
- Shooting the slide, pushing back with your legs and allowing your buttocks to move under your shoulders – Instead, you’ll want to activate your core to maintain the body over the 1 o’clock position.
- Opening the back too soon – Always follow the legs/body/arms sequence
- Using the arms for power, gripping tight and pulling back hard – Only 20% of your power should come from the arms (60% legs, 20% body/core).
- Pulling in high– This makes the rowing stroke less efficient. The chain of the Concept 2 is designed to move in and out in a level motion (think sliding along a table top).
- Stiff back rowing– 20% of your power comes from a strong core with your body tilt from 1:00 to 11:00 position.
- Locking the knees out– This places unnecessary stress on your joints.
At the Finish Position
- Wrists flexed – can lead to injury if done repetitively
- Elbows out vs back – can lead to injury
- Handle height – less efficient and may not be good for the machine
- Stiff back – let your core do the work
During the Recovery Phase
- Rushing the slide – Remember, it is called recovery for a reason. No need to rush. The Recovery phase should take 2-3 times longer than the Drive phase.
- Bending the knees prematurely – Always remember the sequence: Arms, Body, Legs.
- Lifting the handle over the knees – When following the correct sequence, this should not be an issue.
- Dropping the handle down – Less efficient and unnecessary for indoor rowing. On-the-water rowers have to drop down in order to get the blade of the oar out of the water.
Conclusion on Rowing Technique for Beginners
To ensure that your rowing workouts are safe and effective, you need to learn the proper rowing form and master it. Yet, it’s easy to fall back and commit the same mistakes all over again, especially when you’re a beginner.
With constant practice and by keeping in mind the tips and drills contained in this guide, you’ll be perfecting your rowing technique in no time!

Written by Laura Tanley – RowingCrazy.com
Certified Indoor Rowing & Erg Instructor (UCanRow2), Experienced Indoor & On-the-Water Rower & Licensed Physical Therapist
Laura is a mother of two, Certified Indoor Rowing Instructor, Licensed Physical Therapist with concentration in Orthopedics and Vestibular Rehab. Laura has years of rowing experience both indoor and on the water. She is excited to join to share her knowledge with the indoor rowing community.